
Install
One command,
then a step-by-step
installation.
Paste one line into a terminal. It fetches JobSeeker, sets it up on your own machine and opens it — and a setup window takes it from there.
Step one
Windows
Open PowerShell and paste this.
PowerShell is already on your PC. Press ⊞ Win, type powershell, press Enter. Then paste the line below and press Enter again. Do not use “Run as administrator” — the installer refuses an elevated run, because it would land in the wrong profile.
irm https://myjobseeker.ai/install.ps1 | iexWindows 10 or 11, x64 or ARM64. The same command serves all four — there is no separate ARM build to pick, and nothing to choose from a list. Windows PowerShell 5.1, which ships with both, is enough; PowerShell 7 works too.
A web page cannot open PowerShell for you — no browser allows it, and you would be right not to use one that did. The Copy button above is as close as it gets.
You can read install.ps1
before you run it. Everything it prints is also written to
%TEMP%\jobseeker-install.log, so an install that fails in a window you then
close still leaves something to look at.
Why a command and not a download
Windows marks anything a browser downloaded as coming from the internet,
and SmartScreen then refuses to run it until you click through a warning. Nothing here is
downloaded by a browser and there is no .exe to run — the source is unpacked and
started with Node. This is not a way around Windows security; it is simply not the path that
triggers it.
The only time Windows asks for permission is if Node has to be installed from the MSI, and Windows does that asking itself — the installer never sees a password. Re-running the command is safe: it updates in place and leaves your data alone.
macOS
Open Terminal and paste this.
Terminal is already on your Mac. Press ⌘ Space, type terminal, press Return. Then paste the line below and press Return again.
curl -fsSL https://myjobseeker.ai/install.sh | bashmacOS 15 Sequoia or later, on Apple Silicon. Intel Macs are not supported. Everything the installer needs is already on the Mac — there is no Xcode, no Homebrew and no developer tooling to fetch first.
A web page cannot open Terminal for you — no browser allows it, and you would be right not to use one that did. The Copy button above is as close as it gets.
You can read install.sh before you run it.
Step two
The setup window does the rest.
It opens by itself when the command finishes. Nothing is installed until you press Begin, and it lists every download and where it comes from before you do.
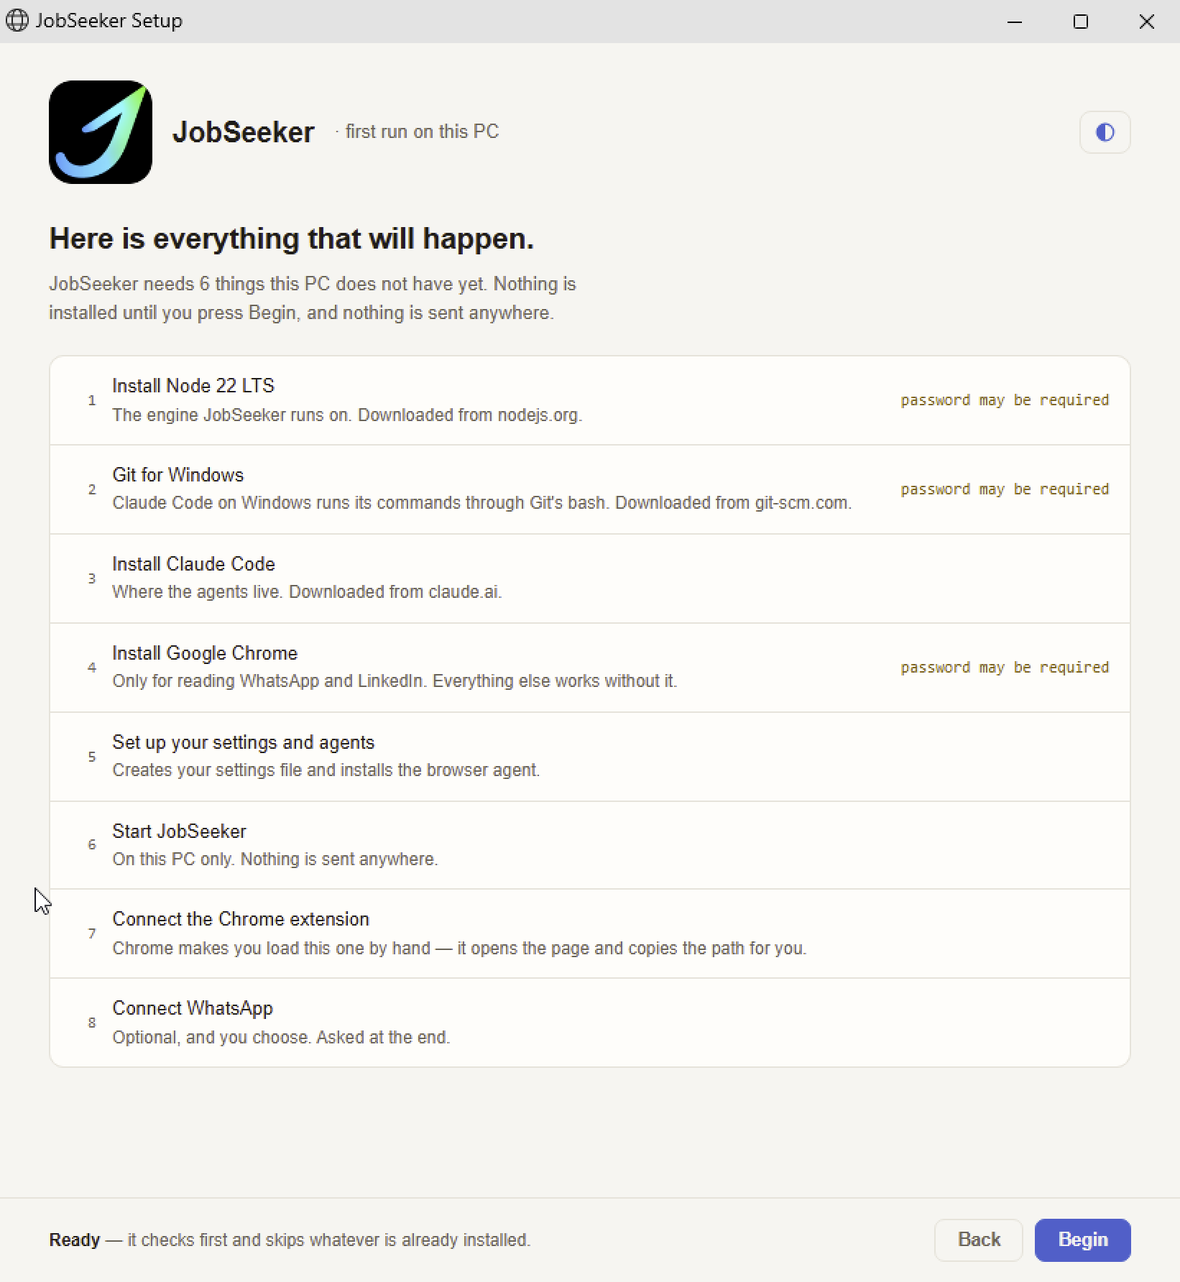
- 1
Node. The runtime the dashboard needs. Taken from winget where you have it, and otherwise the signed MSI from nodejs.org, checked for who signed it before it runs. Windows raises a UAC prompt for the MSI, because Node installs for every account on the PC.
- 2
Git for Windows. Not for version control — Claude Code runs its commands through Git's bash, which Windows does not ship. From git-scm.com. This step does not exist on a Mac, which already has a shell.
- 3
Claude Code. Where the agents live. Installed into your own profile by Anthropic's own installer, so nothing here needs a password. It arrives signed out, and signing in is the one thing nobody can do for you: run
claudein a terminal once and follow it, or press Sign in to Claude on JobSeeker's Setup tab, which opens that terminal for you. - 4
Google Chrome. Only used to read WhatsApp Web and LinkedIn in your own logged-in session. Skip it and everything else still works — you lose those two channels and nothing more.
- 5
Your settings. Creates the settings file and installs the small bridge that lets a scheduled run drive Chrome.
- 6
Start. Starts JobSeeker on this PC and turns the setup window into the app.
- 7
The Chrome extension. The one step no installer can do for you — Chrome does not let a program add an extension on your behalf. Setup opens the right page and copies the folder path to your clipboard, and the steps below are the same ones.
- 8
WhatsApp. Optional, asked last, and skipping it costs you the digest on your phone and nothing else.
Anything already installed is detected and skipped, so a PC that has Node, Git and Chrome only sees the last few steps — the count in the window is what is actually missing, not the length of the list. Afterwards JobSeeker sits in your Start Menu and on your Desktop and opens by double-click. Quitting it quits JobSeeker — there is no PowerShell window to leave open.
 JobSeeker
· first run on this Mac
JobSeeker
· first run on this MacHere is everything that will happen.
JobSeeker needs three things this Mac does not have yet.
- 1Install Node 22 LTS The engine JobSeeker runs on. Downloaded from nodejs.org. password may be required
- 2Install Claude Code Where the agents live. Downloaded from claude.ai.
- 3Install Google Chrome Only for reading WhatsApp and LinkedIn. Everything else works without it. password may be required
- 4Set up your settings and agents Creates your settings file and installs the browser agent.
- 5Start JobSeeker On this Mac only. Nothing is sent anywhere.
- 1
Node. The runtime the dashboard needs. The installer takes the official package from nodejs.org and checks who signed it before running it. macOS asks for your password, because Node installs for every account on the Mac.
- 2
Claude Code. Where the agents live. Installed into your own home folder by Anthropic's own installer, so nothing here needs a password. It arrives signed out, and signing in is the one thing nobody can do for you: run
claudein Terminal once and follow it, or press Sign in to Claude on JobSeeker's Setup tab, which opens that Terminal for you. - 3
Google Chrome. Only used to read WhatsApp Web and LinkedIn in your own logged-in session. Skip it and everything else still works — you lose those two channels and nothing more.
- 4
Your settings. Creates the settings file and installs the small agent that lets a scheduled run drive Chrome.
- 5
Start. Starts JobSeeker on this Mac and turns the setup window into the app. From here the welcome wizard asks for your CV and what you are looking for.
Anything already on your Mac is detected and skipped, so a machine that has Node and Chrome only sees the last two steps. Afterwards JobSeeker.app sits in your Applications folder and opens by double-click. Quitting it quits JobSeeker — there is no Terminal window to leave open.
Apps the agent will connect to
A few tools you already use.
You will need to connect Claude to a handful of things already on your machine — your email, your browser, WhatsApp. That is what lets the work happen automatically while you are not around, instead of only when you are sitting there asking for it. Each one unlocks a different part of the system, so skipping one costs you that part and nothing else. Onboarding checks every one of them and the dashboard tells you which are live.
- Claude Code, signed in. Everything below depends on this
one, so it is worth doing first. The installer puts Claude Code on your machine but it
arrives signed out — reading your CV, scoring roles and the morning run all stop at their
first step until you have signed in. JobSeeker says so on its Setup tab rather than letting
it surface later as work that quietly failed, and the button there opens a terminal with
claudealready running. - Gmail and Google Calendar. Without these, nothing reads your email, and your applications will only ever be as current as what you type in yourself.
- Chrome, connected to Claude. This is what reads WhatsApp and LinkedIn, and what fills in an application inside your own logged-in session — so you are never asked to hand over a password. On Windows this runs through the JobSeeker Bridge extension, which you load into Chrome once and pair with a six-digit code. Without it, email and job-hunting still work; WhatsApp, LinkedIn and assisted applications do not. Chrome also needs one setting ticked by hand, under View ▸ Developer ▸ Allow JavaScript from Apple Events, and macOS will ask you once to permit automation. Without it, email and job-hunting still work; WhatsApp, LinkedIn and assisted applications do not.
- WhatsApp. How the morning digest reaches your phone. It is one-way — the digest arrives, and that is all; you cannot reply to it or give JobSeeker instructions over WhatsApp. Approving and rejecting happen on the dashboard. Without it everything still runs; you just read the digest on the dashboard instead.
- Your CV. Read once, at setup. Every relevance score and every prefilled application answer comes from it, so this is the one thing that makes the results yours rather than generic.
Or, from the source
Same thing, more output.
If you would rather read the code first and run it yourself:
git clone https://github.com/cventour/jobseeker
cd jobseeker
powershell -ExecutionPolicy Bypass -File install.ps1
git clone https://github.com/cventour/jobseeker
cd jobseeker
bash install.shNote there is no npm install step, and that is not an omission — the
whole system runs on Node's own built-ins and on shell, so there are no third-party packages
to download, audit or keep up to date.
If you want to connect your WhatsApp
Windows
Setup does this one for you.
This is how the morning digest reaches your phone. WhatsApp needs a piece of its own — it does not come built in the way your email and calendar do — and on Windows setup installs it and links it to your number for you. Without it there is no digest on your phone; everything else is unaffected.
Only if you want the digest on your phone
It is the last step of the setup window.
There is nothing to install by hand and nothing to type into PowerShell. Setup asks for your WhatsApp number, installs the plugin, asks WhatsApp for a pairing code and shows it to you, with the four taps to make on your phone: Settings ▸ Linked Devices ▸ Link a Device ▸ Link with phone number instead. Type the code in and the window confirms the link.
Skip it and everything else still works — you read the results on the dashboard instead. If this PC is already linked, setup says so and moves on rather than asking again. The plugin's server runs on bun rather than Node, so setup installs that too — but only if you choose WhatsApp.
macOS
The one piece you install yourself.
Email, calendar and the browser are connections Claude already offers. WhatsApp is different: it needs a small server of its own — an MCP server — running alongside Claude Code, and it comes from a separate open-source plugin. Without it installed and paired there is no morning digest.
Only if you want the digest on your phone
The setup window walks you through it.
There is nothing to type into a terminal. On the last screen of setup, enter your WhatsApp number and press Send me a code. It installs the plugin, asks WhatsApp for a pairing code and shows it to you, with the four taps to make on your phone: Settings ▸ Linked Devices ▸ Link a Device ▸ Link with phone number instead. Type the code in and the window confirms the link.
Skip it and everything else still works — you read the results on the dashboard instead. If this Mac is already linked, setup says so and moves on rather than asking again. You can also do it by hand at any time:
claude plugin marketplace add Rich627/whatsapp-claude-plugin
claude plugin install whatsapp-claude-channel@whatsapp-claude-plugin
The plugin's server runs on bun rather than Node, so setup installs that too — but only if you choose WhatsApp.
Worth knowing either way
- It only sends. This server delivers your digest and sends messages you have already approved. It does not read your conversations — that is the browser's job, and a separate decision. So installing it does not give anything access to your chat history.
- Messages come from your own number. Anyone receiving one sees it as coming from you, because it is. If you would rather keep a separate identity for it, pair a different number.
- One session holds the link at a time. WhatsApp allows the server a single device link, so two Claude sessions cannot share it. If you have a scheduled run, it reclaims the link to whatsapp when it starts — otherwise a session you left open days ago would quietly hold it and the scheduled digest would go nowhere.
- It is someone else's plugin. JobSeeker does not ship or maintain it. It is worth reading before you install it, as with anything that connects to your accounts: Rich627/whatsapp-claude-plugin.
One thing to set up yourself
Windows
Let JobSeeker read the tabs you are already signed in to.
WhatsApp, LinkedIn and filling in an application all happen in your own Chrome, in the account you are already signed in to — so you are never asked to hand over a password. To do that, JobSeeker needs a small add-on in Chrome. Chrome does not let a program add one for you, so this is the one part you do by hand. It takes about a minute, and you only ever do it once.
Everything else needs nothing from you. Your email and calendar, researching companies, finding roles and scoring them against your CV all work the moment setup finishes. Skip this and you lose WhatsApp, LinkedIn and assisted applications — and nothing else.
Only for WhatsApp, LinkedIn and assisted applications
Four steps, with the screen in front of you.
Setup offers this at the Chrome step, and if you skip it there, JobSeeker keeps offering it in Settings until it is done. Both show the same instructions and the same code, so start from whichever one you are looking at.
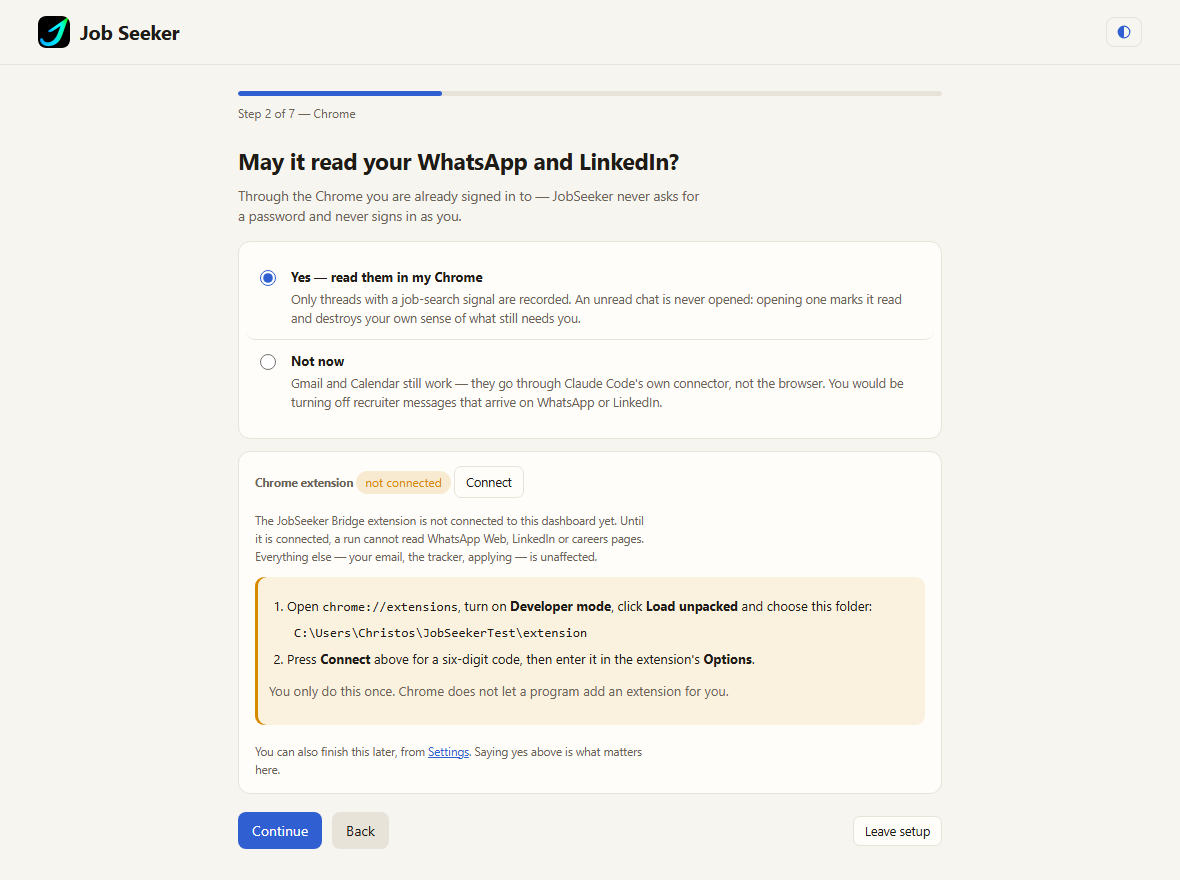
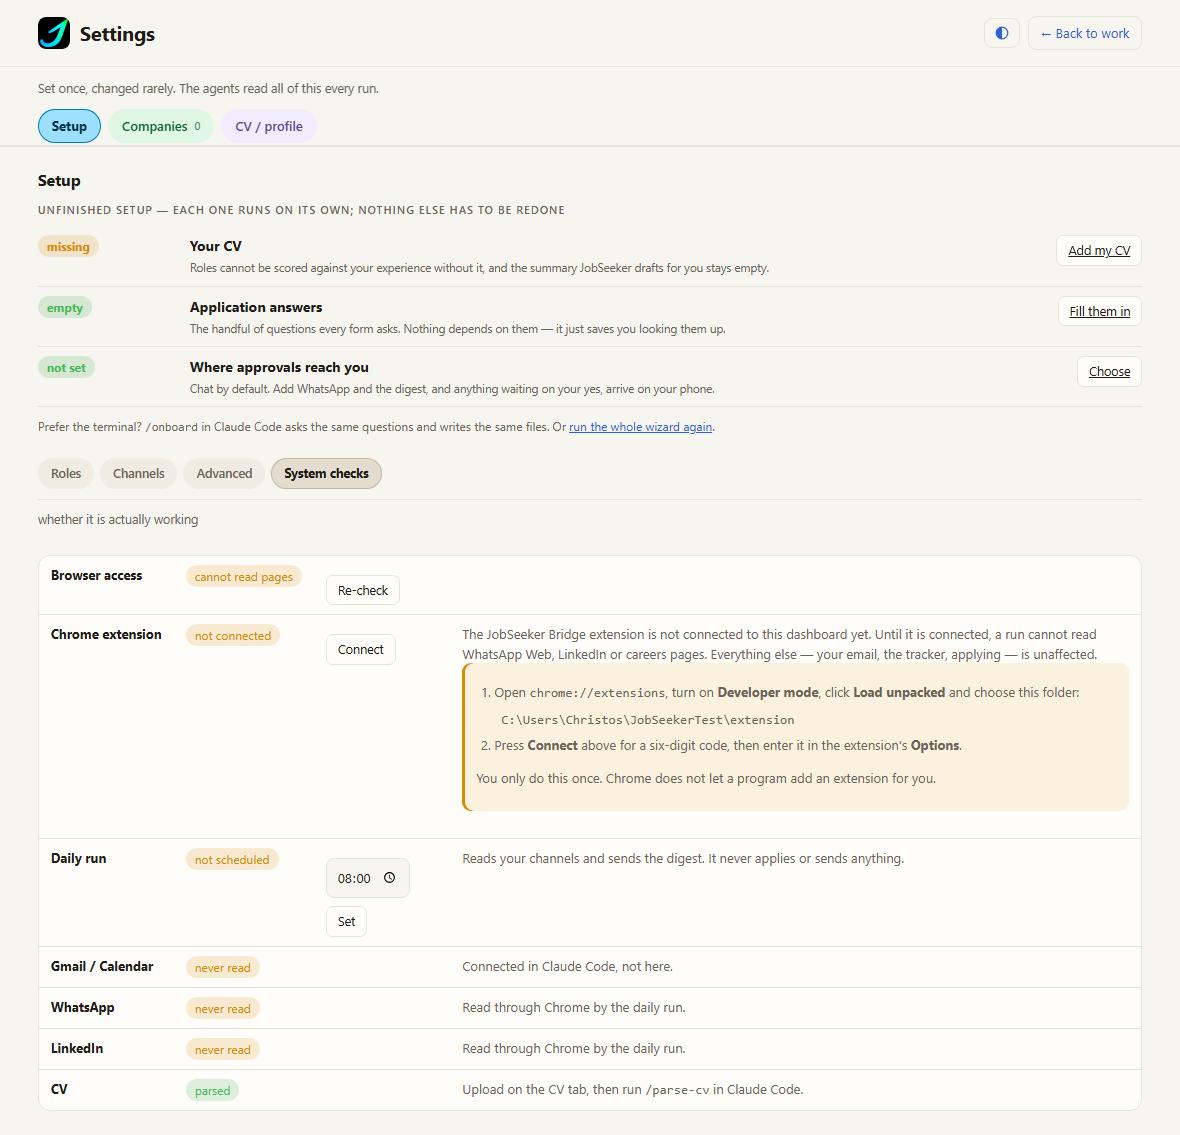
- 1
In Chrome, go to chrome://extensions and switch on Developer mode, top right. Nothing installs by itself — this switch only reveals the button you need next.
- 2
Click Load unpacked and choose the folder JobSeeker showed you.
- 3
Back in JobSeeker, press Connect. It gives you a six-digit code.
- 4
On the JobSeeker Bridge card in Chrome, click Details, scroll down to Extension options, and type the code in.
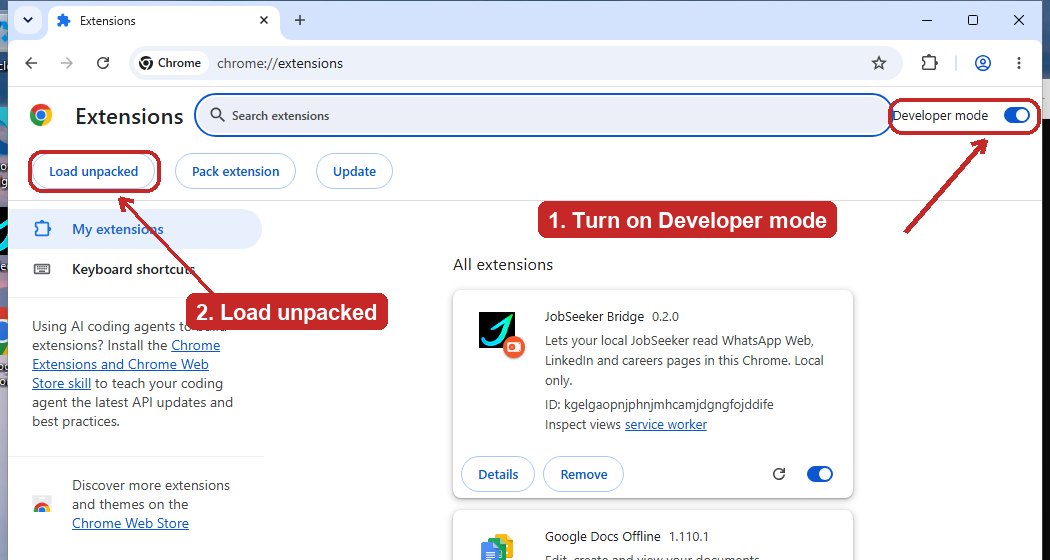
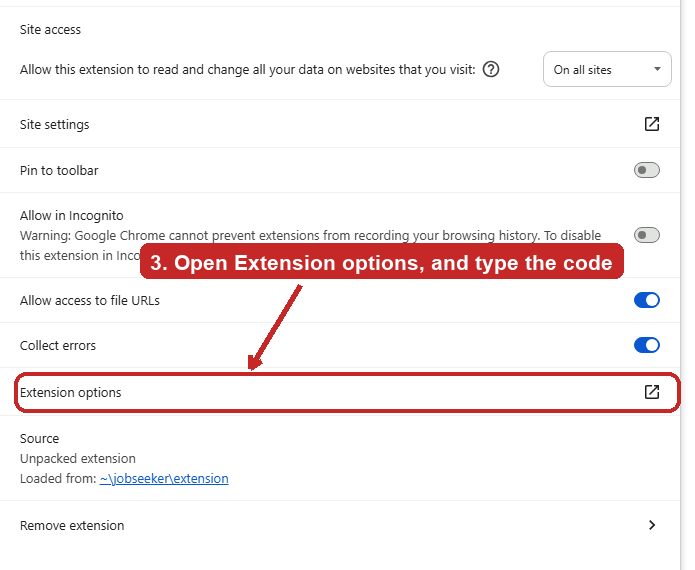
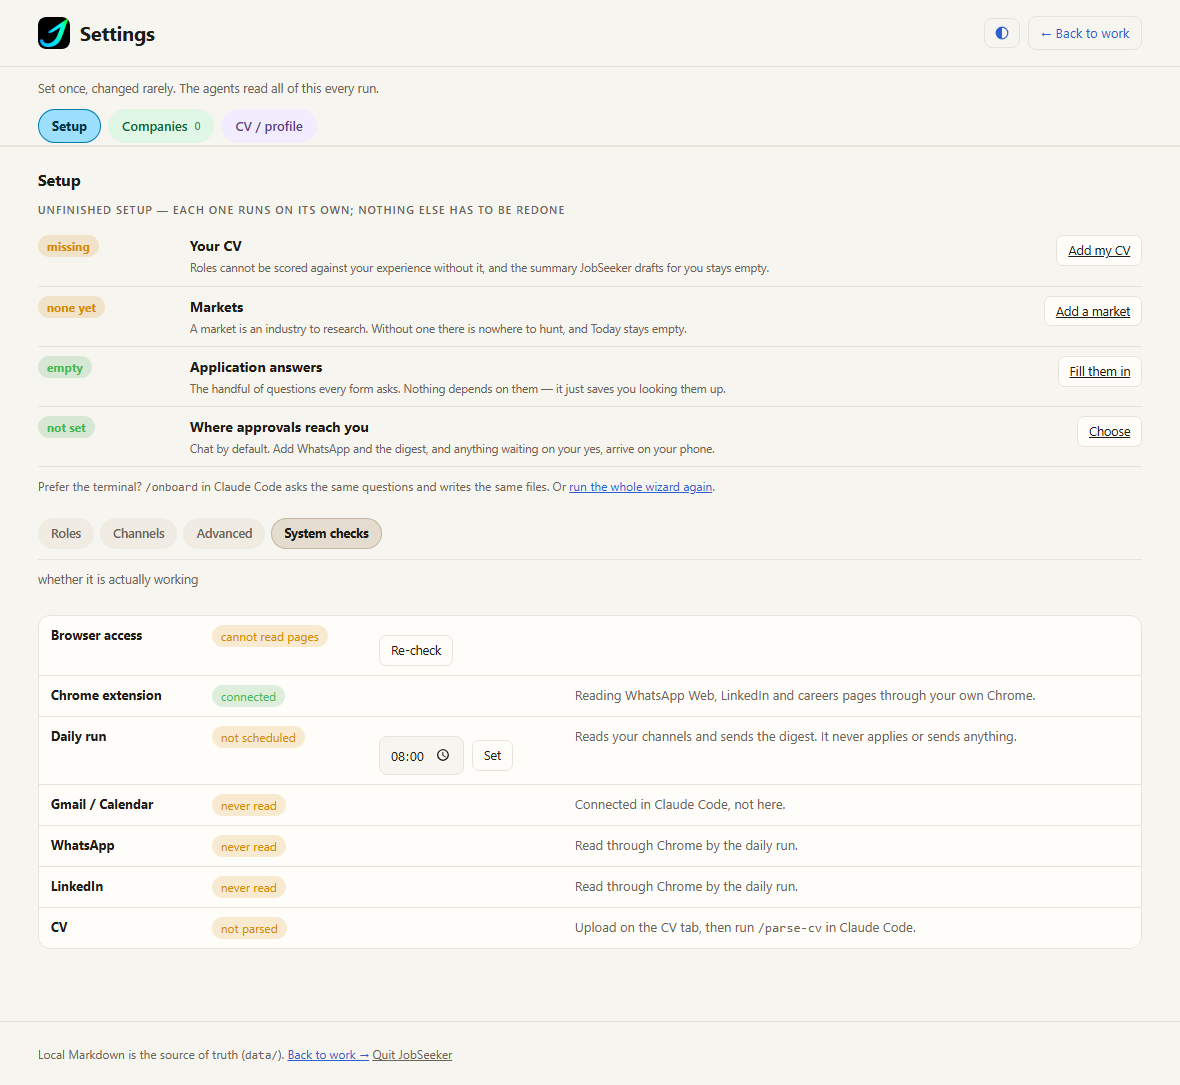
The code is good for a few minutes and works once. What it sets up lasts: it survives closing Chrome, restarting JobSeeker and rebooting your PC. You would only do this again if you removed the add-on yourself.
One Chrome setting is worth a look. Chrome puts background tabs to sleep to save memory, and a sleeping tab has nothing left to read. In Settings ▸ Performance, add web.whatsapp.com and linkedin.com to the sites Chrome should always keep awake.
If you want it to run every morning on its own
Pick a time in Settings.
Open Settings ▸ System checks and find the Daily run row. Choose a time, press Set, and that is the whole of it. The row then shows the time it will run, with a Remove button next to it if you change your mind.
JobSeeker will wake your PC at that time if it is asleep, as long as you are still signed in to Windows. It reads your channels and sends you the digest — it never applies for anything or sends a message on your behalf without your say-so.
Nothing else to approve: the run uses the same Chrome connection you set up above, so if that is working while you watch it, it works at seven in the morning too.
What it never asks for
- Administrator. The installer refuses to run elevated. The one UAC prompt you may see belongs to the Node MSI, and Windows raises it, not JobSeeker.
- A Chrome debugging port. Deliberately avoided — leaving one open would let any program on your PC drive your browser as you, which is a much bigger door than this needs. The bridge extension exists precisely so that port does not have to.
- Anything outside your own profile. Only
%USERPROFILE%\JobSeeker, your Start Menu folder and your Desktop are written to. - Screenshots. Nothing is ever captured off your display. Page text is read directly.
To check what is actually working at any point, or after changing something:
npm run browser:probeIt reports each capability separately rather than one vague failure, so you can see whether the bridge is unreachable, unpaired, or simply not connected because Chrome is closed. The full reference lives in PERMISSIONS.md.
How to prepare your Mac
macOS
Setting up permissions for the agents to do work for you.
Setup handles this for you — it triggers each prompt at the right moment and then checks the result rather than assuming it worked. This section is here so you know what you are agreeing to, and so you can skip the parts you do not need.
The whole of it comes down to one macOS permission: Automation ▸ Google Chrome, which is what lets JobSeeker read a page you already have open. How many times you grant it depends entirely on how you intend to run things.
Everyone
Nothing to change.
Reading your email and calendar, researching companies, finding roles and scoring them against your CV all happen through Claude's own connections. None of it touches a macOS privacy setting. If that is all you want, you are already done.
Only for WhatsApp, LinkedIn and assisted applications
Let Claude read a page in your browser.
These are the only features that need your real browser, because they depend on you already being logged in. The first time it happens macOS asks whether Claude may control Google Chrome — click Allow. You can trigger that prompt deliberately, while you are sitting there, rather than being surprised by it later:
npm run browser:probeChrome then needs one box ticked by hand, which no script can do for it: Chrome menu bar ▸ View ▸ Developer ▸ Allow JavaScript from Apple Events. Without it, JobSeeker can see that you have eleven unread on WhatsApp Web but cannot read them. It is a Chrome preference rather than a macOS one, so it will not appear in System Settings. There is deliberately no script for it: automating that menu would need blanket Accessibility access, which is a far larger permission than one checkbox is worth.
Expect this prompt to come back occasionally. macOS attaches the permission to the exact program that asked, and Claude Code is version-pinned — so a new version is, as far as macOS is concerned, a new program asking. Clicking Allow is permanent for that version. You are at the keyboard when it appears, so it costs you a click.
When you want it to run on schedule, as a routine
The scheduled run asks separately.
This is the part worth understanding, because it is the one that fails quietly.
macOS ties permission to whichever program does the asking. When you run things yourself that
is Claude. When the daily run fires by itself it is bash, which macOS treats as a
completely different requester — so approving one does not approve the other. That is
exactly how a set-up that works perfectly while you watch it does nothing at 08:00, with
nobody there to click the dialog it is waiting on.
So you clear that second prompt once, on purpose, while you are present:
launchctl kickstart -k gui/$(id -u)/com.jobseeker.browserClick Allow and the scheduled run is covered for good — unlike the interactive one, this grant survives updates and reboots, because it is attached to a system binary whose identity never changes.
If you would rather not grant it at all, do not schedule anything. Run the morning routine by hand when it suits you and this whole tier is unnecessary. Setup skips it entirely when you decline the scheduler. To choose a time later, or to change your mind:
npm run schedule -- 09:00And to stop it running on a schedule again:
npm run schedule -- --removeWhat it never asks for
These are the permissions people expect an automation like this to want. It works without every one of them, by design.
- Accessibility. Nothing here clicks, types or submits on your behalf without you watching. There are no synthetic keystrokes to grant.
- Screen Recording. Nothing is ever screenshotted. Page text is read directly, not captured off your display.
- Full Disk Access. Only this project's own folder is read and written.
- A Chrome debugging port. Deliberately avoided — leaving one open would let any program on your Mac drive your browser as you, which is a much bigger door than this needs.
To check what is actually working at any point, or after changing something:
npm run browser:probeIt reports each capability separately rather than one vague failure, so you can see whether the problem is the macOS grant, the Chrome checkbox, or Chrome simply not being open. The full reference lives in PERMISSIONS.md.
Then
claude
> /onboard
Or open the dashboard and use Settings ▸ Setup, which does the same thing in a form — targeting, spend caps, the daily run time, and a live check of what is working.
Onboarding asks what you are looking for — markets, roles, locations, seniority — reads your CV, and saves your answers. After that, one command each morning:
> /job-run